PHOTO MONDAYS
Virtual photography program for teens!
WEEK #9: Movie Night Comes to Life!

You can focus on a scene with a lot of natural light, like this one. Film Still from Stranger Things, Season One. Cinematographer, Tim Ives.
This week’s activity is brought to you by Beyond the Lens: Jackson Ward photo mentor, Maya Jackson!
To get started…
Watch your favorite movie and choose one of your favorite scenes. While you watch the scene pay attention to details like the lighting and framing. Pause the movie and look at the frame you’ve paused on like it is a single photograph. Then recreate the scene asking someone (or multiple people) to pose for a photo to help you recreate the scene.
Vocab…
Framing: The frame is another word for the photo that you are taking. When you look through a viewfinder you only see a portion of what is in front of you, right? Everything that is inside of that viewfinder is considered in “frame”.
When you recreate your movie scene think about what the cinematographer (or director of photography) intentionally cut out. Did they only show the shoulders and head of a person? How close would your subject have to be to your camera to cut off the rest of their body so that only their shoulders and head remain in frame?
Film Still: A film still refers to the individual images that make up the movie. When you pause the movie you are stopped on just one frame of the entire film.
Did you know that on every film there is an entire camera department?
Part One: Pick one of your favorite movies to watch!
Pause the movie on one of your favorite scenes.
Study the body language, lighting, and environment of the scene. Are the characters inside or outside? Are they facing towards or away from each other? What do their facial expressions and body language say about what’s happening in the story? What props are being used?
Part Two: Have family members help you to recreate the scene in real life!

Or focus on a scene with available light sources, like lamps and light from the TV. Film Still from Moonlight. Cinematographer, James Laxton.
Experiment with lighting in the room and try to match it to the movie scene as closely as you can.
Think about the background and surrounding areas of the room your scene will be in; Remove any clutter or unrelated objects that you think will be distracting from the scene.
Pose your family like the characters in the scene, instruct them on what facial expressions to have and how their body language should be.
If there are props in the scene or the character is holding something, use a household object to represent that in your recreated scene. (It doesn’t have to be exactly what’s in the movie!)
Using your camera, photograph the scene you recreated! Be mindful of your framing while you take this photo. It might help to have the paused scene near you while you set it up. Does your photo show more or less of the body than the film still? You can move your camera or ask your subjects to move within the frame to achieve your
Draw or take a picture of the original scene from the movie and see how they compare!
We’d love to see your movie still recreation! Share your work by posting on Instagram using the hashtag #OAPhotoMondays and follow @oakwoodarts, or email your photos to liana@oakwoodarts.org
WEEK #8: Narrative

Example of a Close Up Shot. So Sad Today by Petra Collins.
Photographs have a unique ability to convey a message and tell a story. This week we are going to tell a story with our photos using narrative — just as with writing — the establishment of a clearly defined, developed narrative is the foundation of all successful storytelling.
What is Narrative Photography?
Narrative photography is the idea that an image or a series of images can be used to tell a story or create a narrative.
By utilizing a variety of camera controls and creative tools, you as a storyteller can begin to craft a narrative through your imagery by highlighting what is important, what is not, and asking questions like "What is the story I want to tell?"
Some key terms that will help you in your storytelling process:
Long shot: Shows the subject from top to bottom; for a person, this would be head to toes, though not necessarily filling the frame. The character can still be the focus but the shot tends to still be dominated by the scenery. This can also be thought of as your establishing shot. A good establishing shot allows the viewer to become acquainted with the scene. Generally, establishing shots are shot with wide angle lenses(zoomed all the way out). They are designed to inform the audience where the story will be taking place.
Medium shot: Not too far, not too close. A medium shot is captured at a medium distance from the subject. It can depict body language and can reveal more of the setting. Oftentimes it will frame multiple subjects as well as a portion of the background.
Close up: it’s just as it sounds! A close up is when you take a photo close to your subject, showing details which can reveal more about the story you are trying to tell. The close up lets the viewer see things that they may miss in other shots.
Sequencing: When making a narrative photo series, it is important to not only create images that help tell your story but also to think about how you want them arranged later when people see them. This is called sequencing. The way that you sequence your images can assist with how your story progresses.

Example of a Long Shot. Huis Marseille by Deana Lawson.

Example of a Medium Shot. Baltimore by Torrance Hall. (You may remember Torrance was a guest speaker at our Beyond the Lens: Jackson Ward summer photo camp!)
To get started...
What story do you want to tell? The story of a person’s experience? The story of your pet’s day? The story of your feelings about an event? The story of an object?
Create a quick storyboard to plan out your narrative. You don’t have to be great at drawing, these are just quick sketches to get your ideas out! A storyboard is a graphic organizer that plans a narrative. Storyboards are a powerful way to visually present information; the linear direction of the cells is perfect for storytelling, explaining a process, and showing the passage of time.
Some things to consider before photographing:
What type of lighting would portray the kind of emotion you are trying to show?
Will your series have human subjects? Animals? A plant? An object?
Think about your composition. How might these choices affect your images?
Do you want the photographs to feel staged or more natural? How might this affect how you ask to photograph the subject?
Think about your point of view when taking the photo, what angle are you shooting from? Are you shooting from up high, low, centered, close, far away? How might this affect how your photo turns out and how the image feels to the viewer.
If you are taking multiple portraits, will all your portraits be set up in a similar way, like a series, or will they all be shot differently with a new idea for each one?
Will you photograph in black and white or in color? Will you do any editing or adjustments after you shoot? how might that affect how the photograph feels?
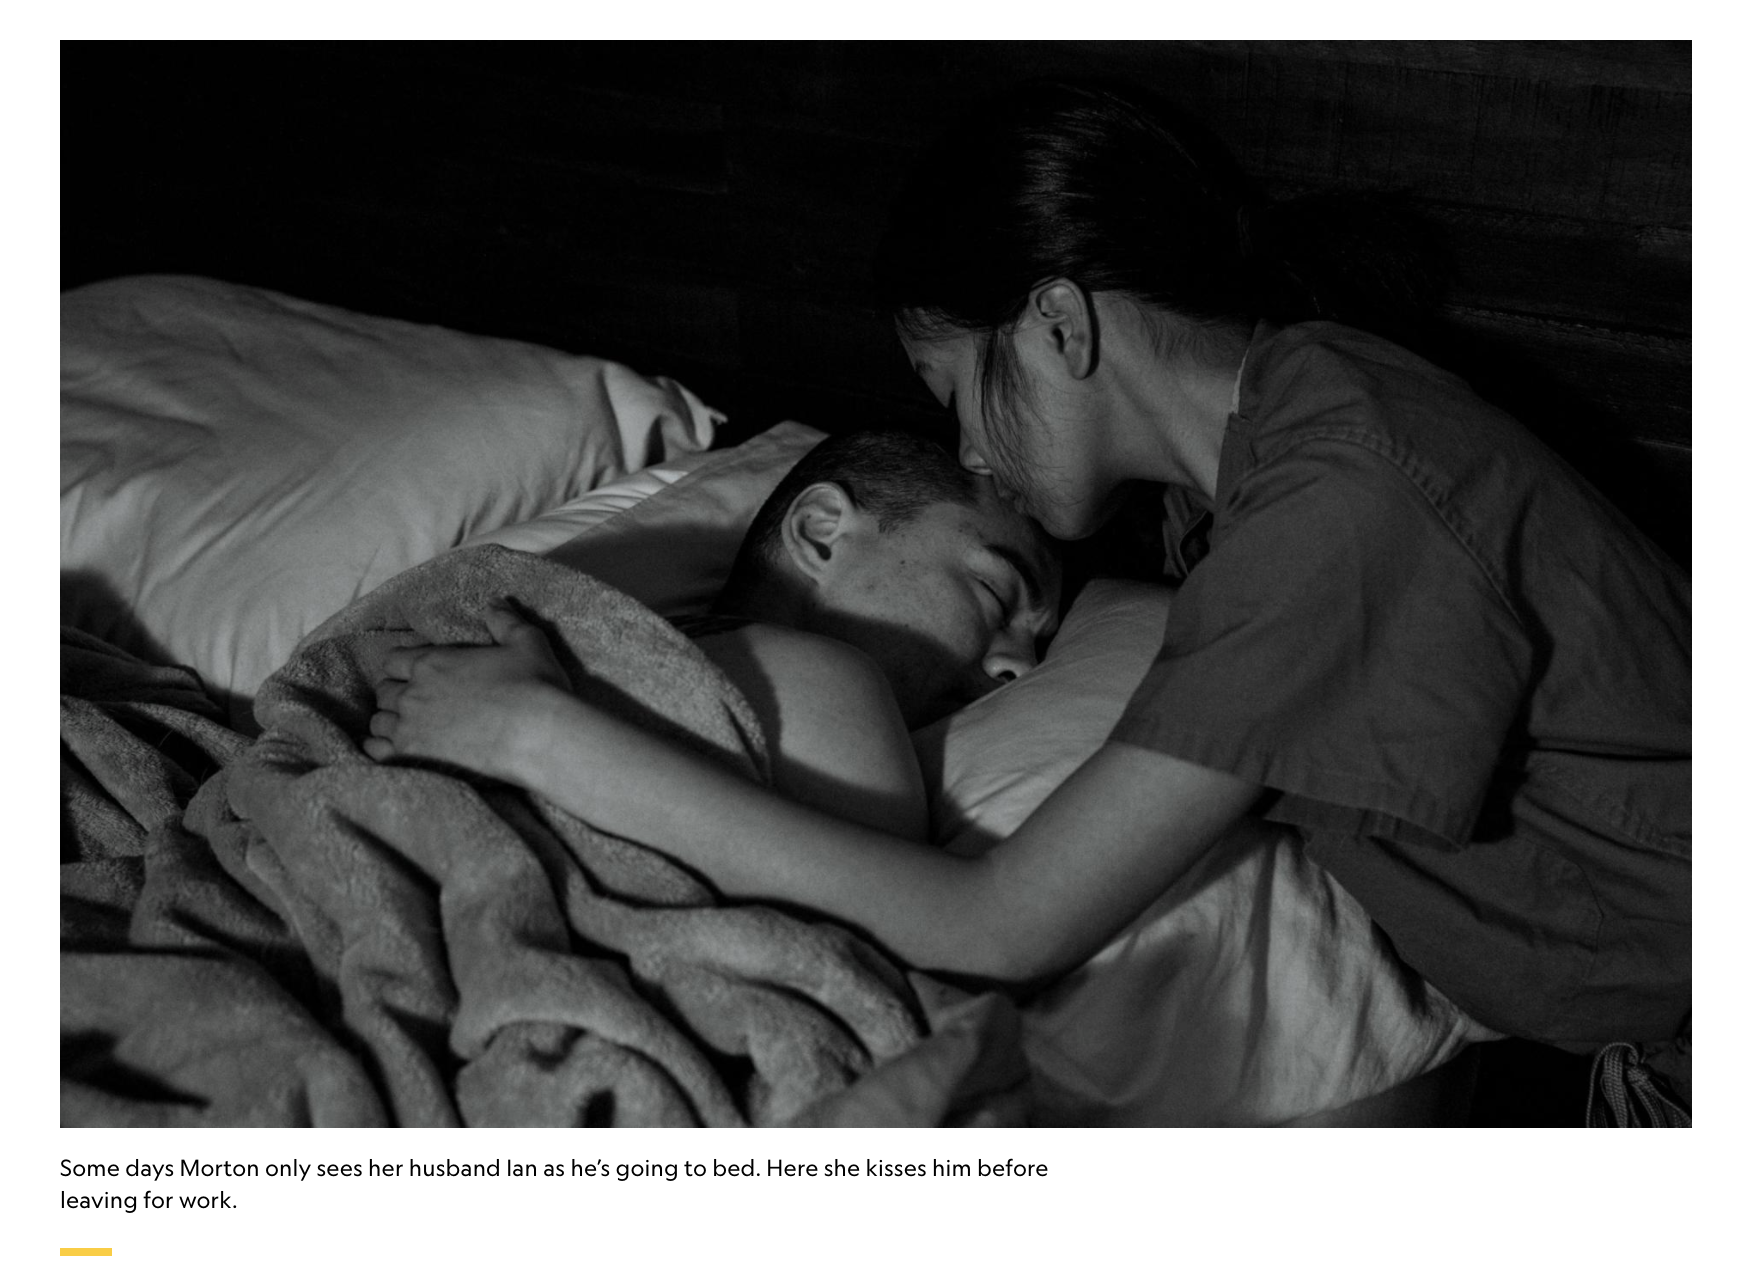
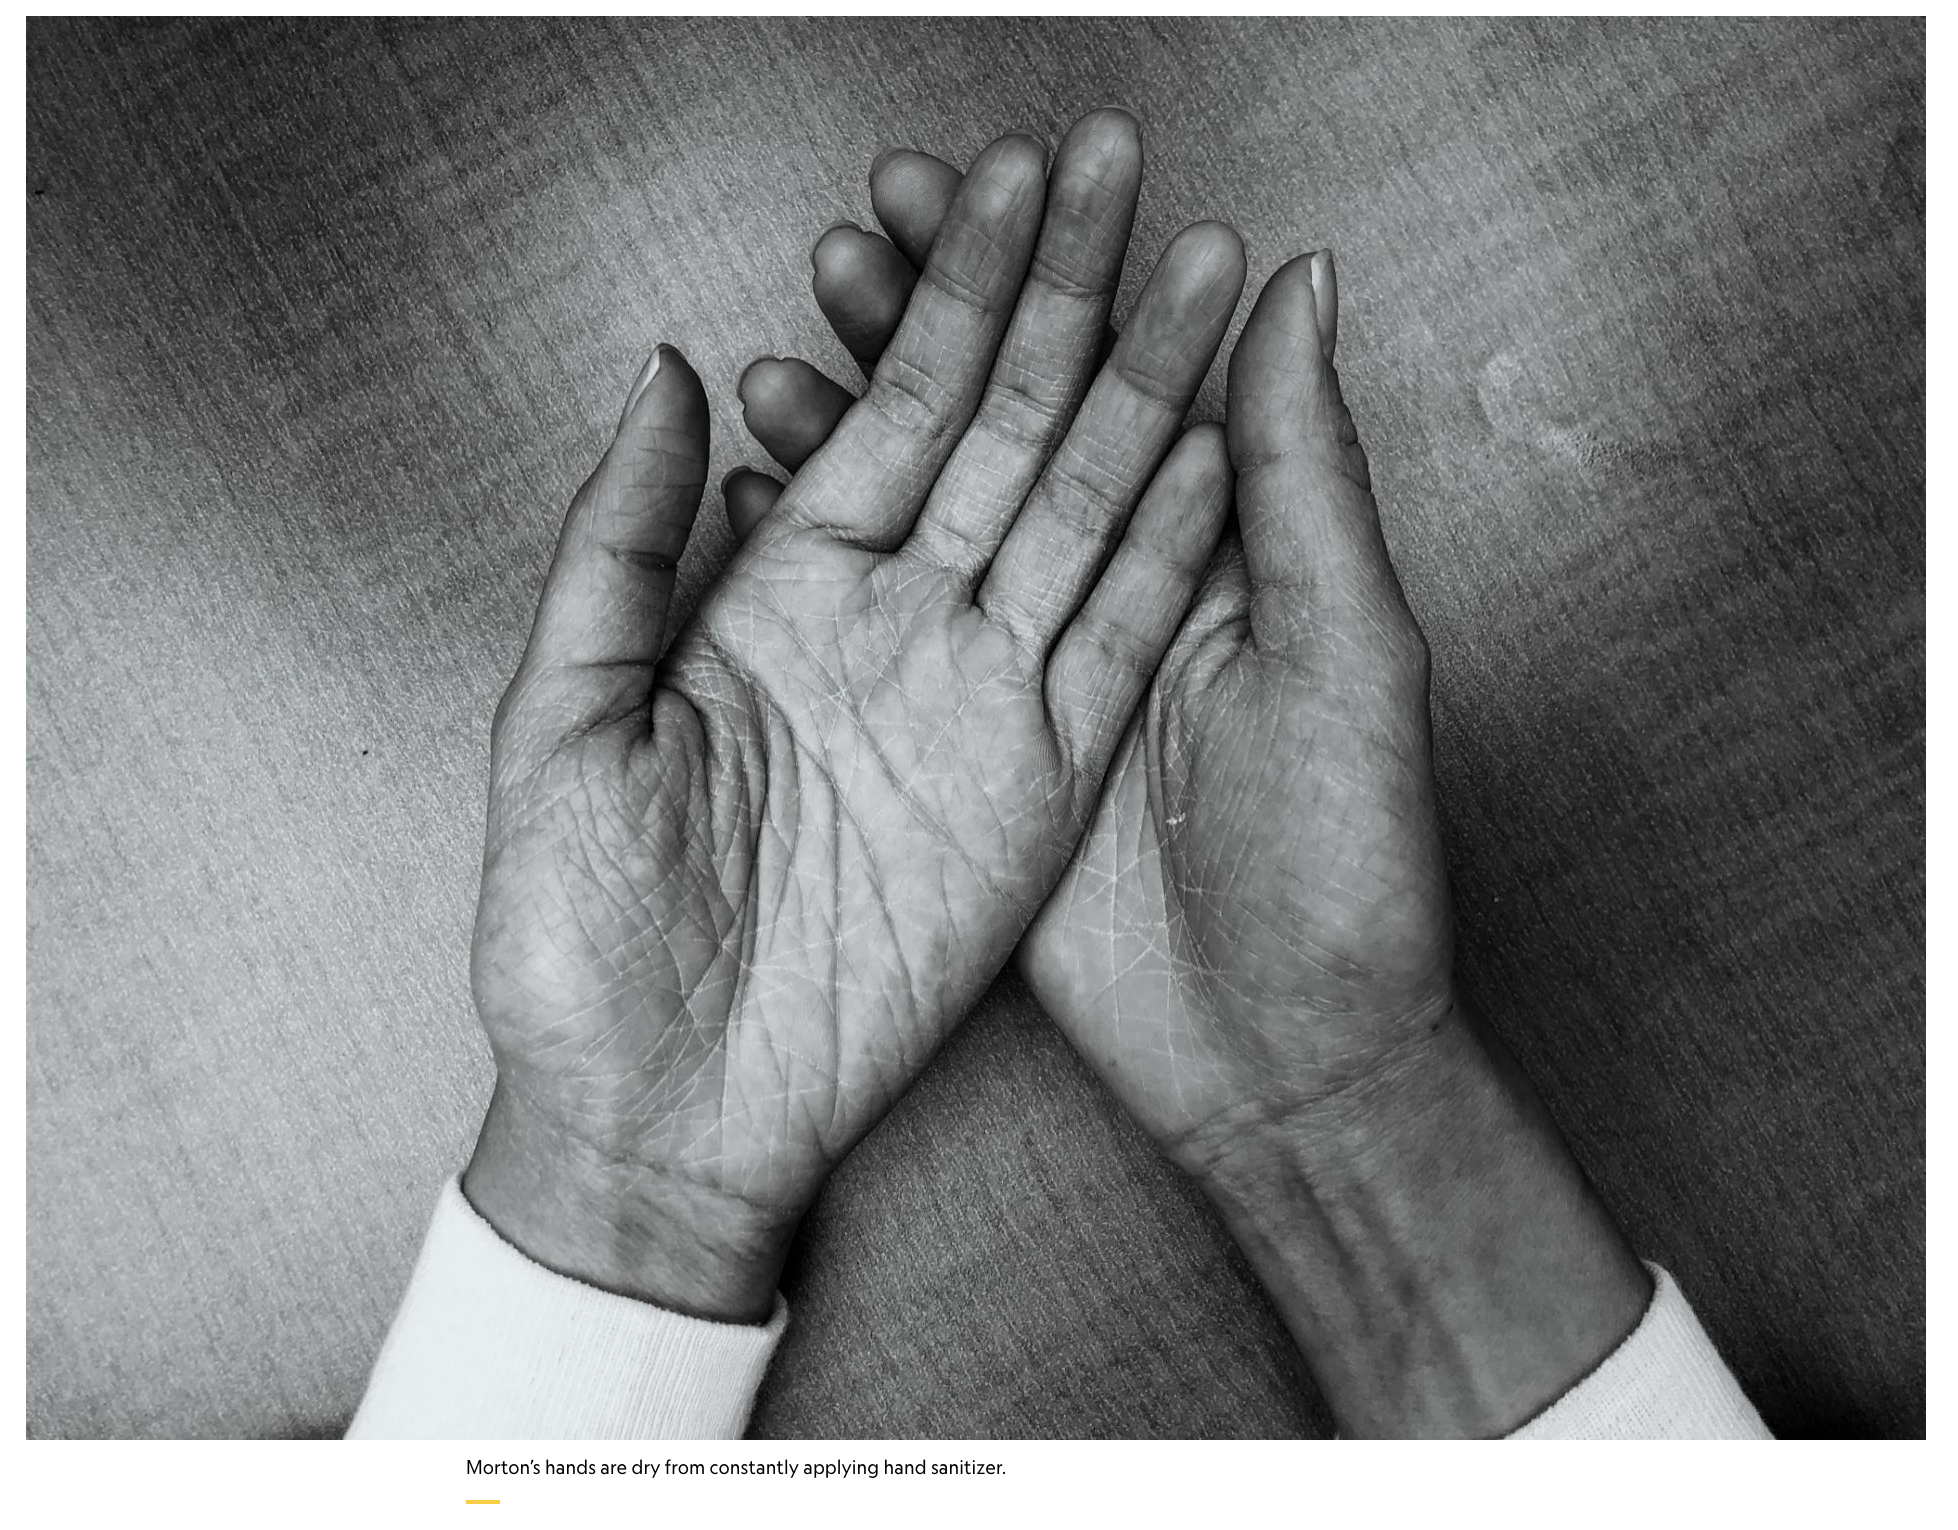
A great example of a narrative photo series is in this National Geographic coverage of the coronavirus. Check out a long shot, medium shot, and close up from the series below. Follow the link to view the whole project.
We’d love to see the story you tell! Share your work by posting on Instagram using the hashtag #OAPhotoMondays and follow @oakwoodarts, or email your photos to liana@oakwoodarts.org
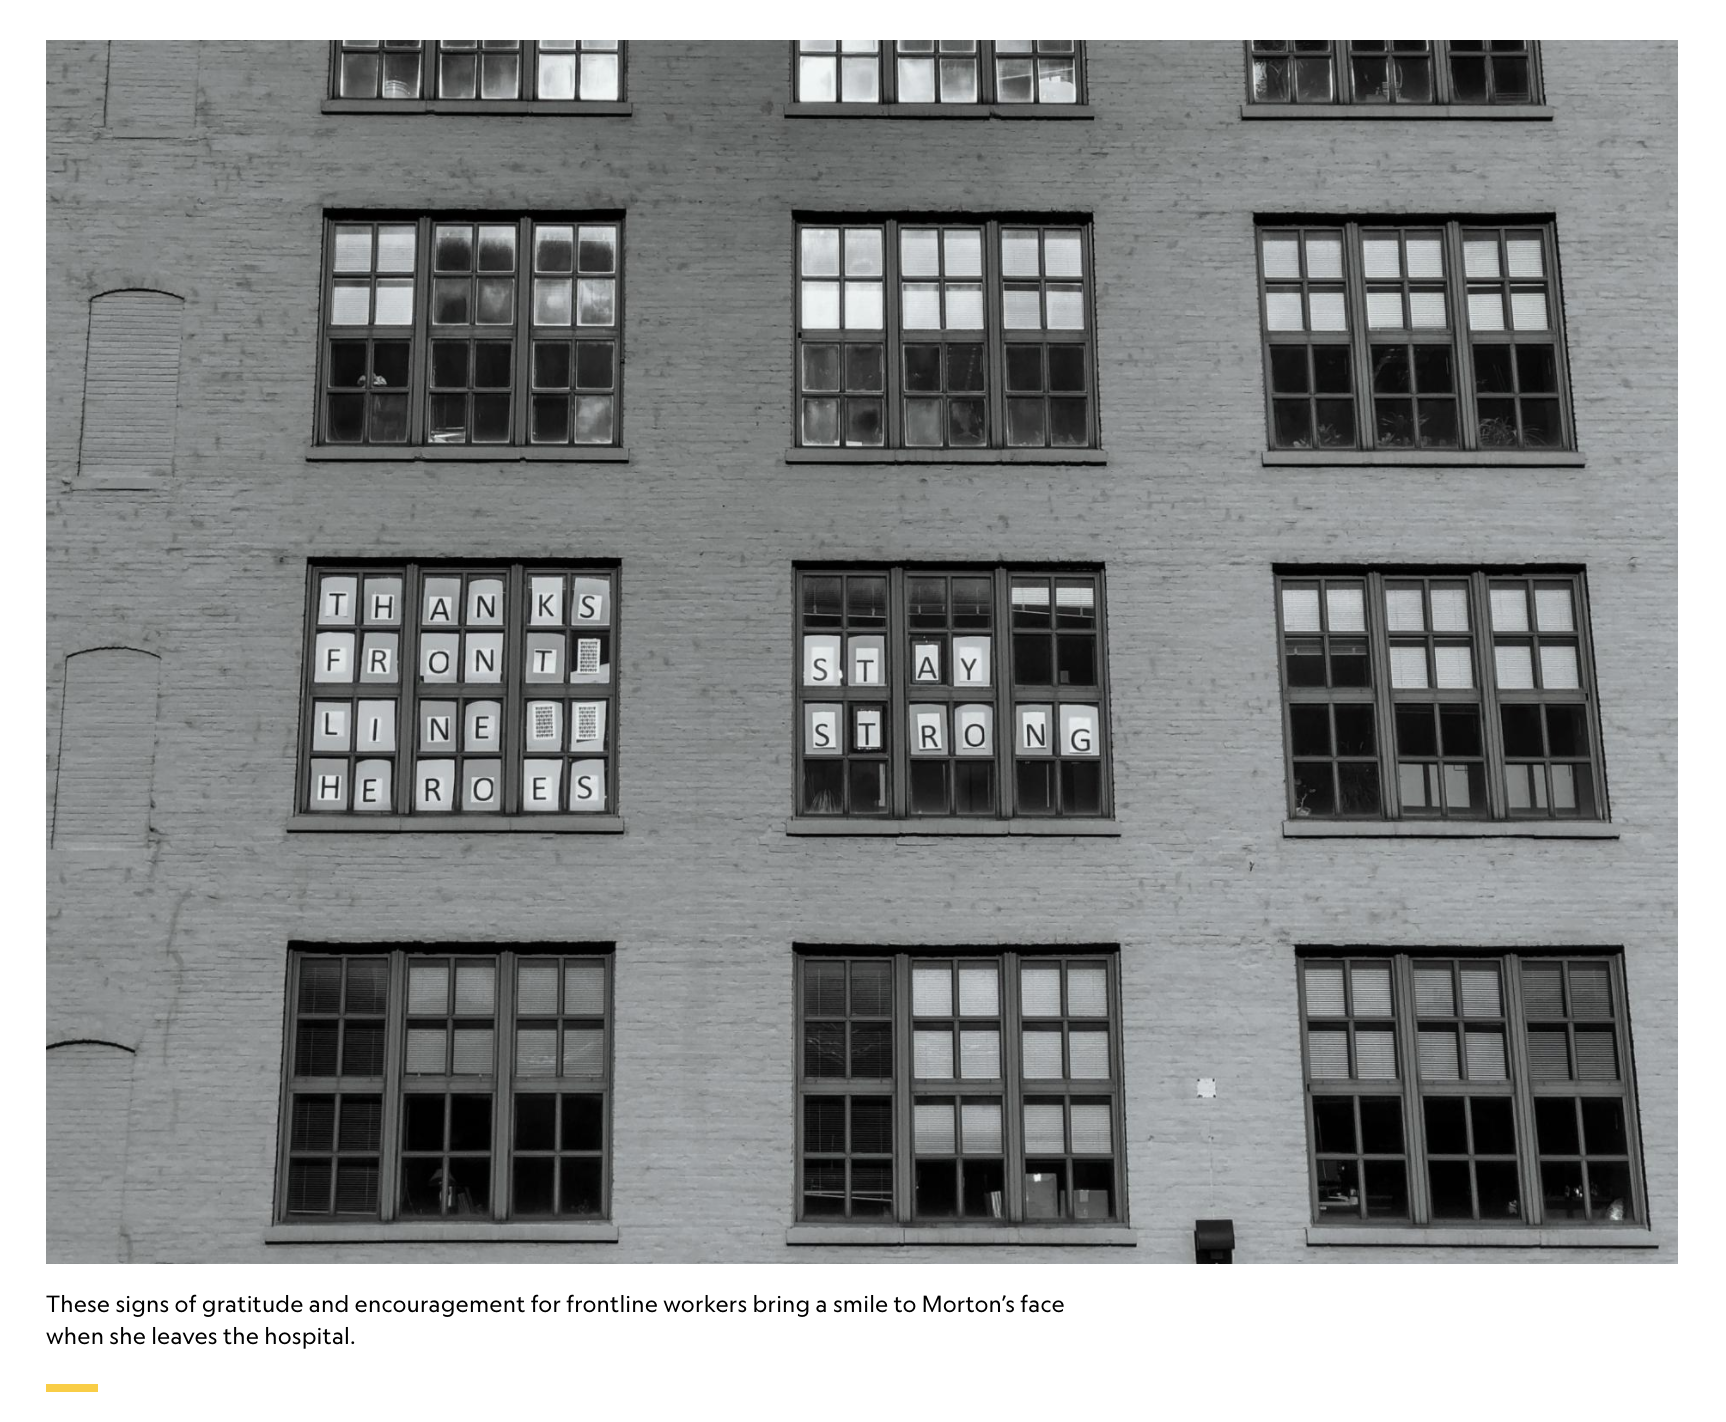
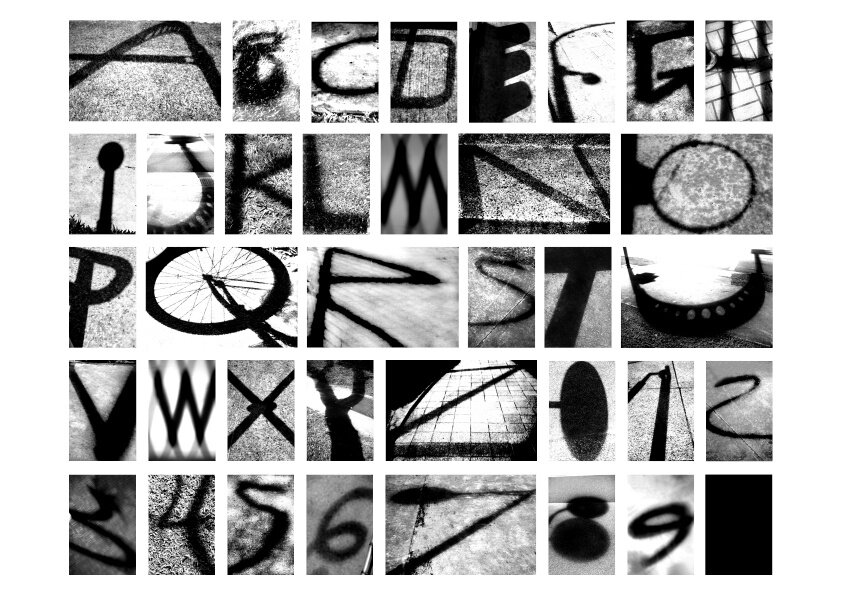
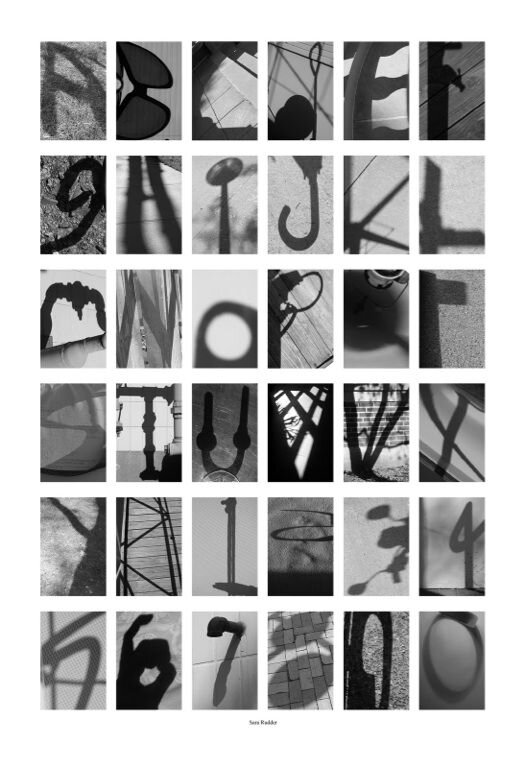
WEEK #7: Encouragement Banners: Photo Typography
This week we are going to create encouraging banners, with a photographic alphabet made from everyday items like wheels, bricks, light posts, architectural curves, trees and so much more.

To get started…
Think of something encouraging you often tell yourself. For example: Everything will be ok. Or: You are enough. Write down these encouraging statements on your phone or a piece of paper.
Go on a walk! Bring your encouraging statements with you. Keep a lookout for things in your environment that look like the letters your statement needs.
As you walk, take photos using your camera. Remember to get close to objects to abstract them in order to find the letters within them. (If you are having a hard time finding letters on your walk or the weather is bad, try looking within your home! I made mine from only items in and around the house.) Get creative! You can even use shadows.

4. Once you have all your photographs, it’s time to get them onto a computer. You can do this by taking the SD card out of your camera and putting it into the small slot on your computer which is called the card reader. Never force the SD card into the slot, if it doesn’t seem to be going in, try flipping it over. What if I don’t have a card reader? Your cameras may have a cord that you can plug into your computer to get the photos from your camera onto your computer. If you are using your phone, you can email the photos to yourself and download them onto a computer from your email. Android. Apple.
Now it’s time to edit!
Go to https://pixlr.com/! Pixlr is like Adobe Photoshop but it’s free and online. To make a banner in Pixlr, follow these steps:
Click “Advanced Pixlr E”
Click “Create New”
Where it says Name, type in “EncouragementBanner_[FirstName]_[LastName]”
Set your Width at 4096 and your height at 430. These are the number of pixels.
What is a pixel? A pixel (short for picture element) is a single point in a picture. On the monitor of a computer, a pixel is usually a square. Every pixel has a color and all the pixels together are the picture.
Click the blue “Create” button. This will open your document. It should look long and skinny.
You will see tools on the left hand side. If you hover over these things they will tell you what they are each used for. On the right you will see “Layers”. This is where the different parts of your overall image will be, (for us that will be each of your photos.) Start by clicking the plus button (+) under “Layers” on the right hand side, and when the pop up appears, click “empty”
Then go to your toolbar on the left side. Click the icon that looks like a paint bucket.
Now click your long and skinny checkerboard document. It should have filled in with a solid layer of either white or black. Make sure to click on the arrow tool at the top of the tool bar when you are done.
Across the top you will also see a list of things to also help you navigate your document. Click where it says “Layer” at the top.
Go down to the option that says “Add image as Layer”
This should open a folder of images on your computer. Find your photos and select the first letter for your encouraging statement.
Your photo will come in much larger than the banner space! Now it’s time to reduce it’s size. To zoom out hold ctrl(PC)/command(MAC) and tap the - key hold until you can see all four corners. OR click the magnifying glass on the toolbar.
Click one of the blue squares in the corner of your image and hold while dragging inwards to make your photo smaller.
Once the appropriate size, click and drag your image to move it to the right side in order to begin your statement.
Once you’ve placed your image, go to your layers panel on the right side. Right click (PC) or control click (Mac). Where it says Layer Name, delete what is there and replace it with the letter that your image represents.
REPEAT steps 9 - 15 until your statement is complete.
If your statement is long, you may need to make your images smaller to fit them. Do this by clicking on layer labeled with the letter you want to change. Then on the top bar, click “Layer” > “Free Transform”
Use the blue squares in the corner of your image to make it smaller by dragging inward. When using “Free Transform” it is important to hold down the Shift key while you change the size, otherwise it will distort your image.
If you had to make your images smaller to make them fit the width of the document, use the Crop tool on the left toolbar. Make sure on the top where it says “Constraint:” make sure you have selected “Free”. Now drag using the white marks to crop the document to the edges of your images.
Edit your images how you wish. I chose to turn mine black and white. Or keep them as they are!
Lastly! Click “File” > “Save”. Move the Slider to 100% then click “Download”
Optional: If you have a printer and everyone in your house is ok with you using it to print photos, print out your images separately in black and white and string them together by poking two holes in the top of each one and running string through the holes. Then hang your encouraging banner somewhere you think it will be most beneficial. Maybe the banner hangs in your bathroom above the mirror or maybe it goes in a window for neighbors walking by to see!
Post your digital or physical banner online and tag everyone you want to encourage! Don't forget to #OAPhotoMondays or email to liana@oakwoodarts.org so we can see your beautiful work.

WEEK #6: Turn your room into a Camera Obscura!
What is a Camera Obscura?
Camera Obscura (from latin, meaning “darkened room”) is an optical device that was used by artists to make sketches in the field and by astronomers so that they could study eclipses without looking directly into the sun around the 19th century. A Camera Obscura is the natural optical phenomenon that occurs when an image of a scene is projected through a small pin hole in a darkened room as a reversed and upside down image on the walls. The invention of the first camera obscura (or pinhole camera) was significant in the history of optics and photography.
What you will need:
A room in your home that gets the most light, and has the fewest windows
Any materials around your home that can block out light coming through any windows or doors. This could be trash bags, towels, wood scraps, cardboard, old shirts, black construction paper or anything you can think of!
scissors
roll of tape
small sheet of tin foil
camera
tripod, or somewhere to set your camera down
a bright sunny day!
Step 1: Getting your room as dark as possible!
You’re going to want to start by covering all windows using your materials, blocking out all the light coming into your room. Make sure to account for all the corners and any light leaks coming from the doors or windows. The darker you make the space the more clearly the outside will project through the pinhole.
Step 2: Making your pinhole!
grab your sheet of tinfoil and make a small hole into the center with a pencil or a pair of scissors. You don’t want your pinhole too big or too small, the larger you make the hole the more light will come through. Experiment with different sizes to see what works best for your specific location and lighting situation. After covering your windows, cut out a small hole (or leave space ahead of time if you’re using materials you can’t cut through) into your window covering and tape it in place.
Step 3: Document what you see!
Get your camera out and take a photo of what you see. Using a camera that you can adjust the settings on will help you see the effect. Any camera with a manual setting will be able to do this, although all of these settings are on different places on different cameras. If you need help finding these settings on your camera, youtube is a great resource! Search for the make and model of your camera and the setting you are looking for using the vocab words below.
Vocab:
Shutter Speed: In photography, shutter speed or exposure time is the length of time when the film or digital sensor inside the camera is exposed to light.
Aperture: the opening in a lens through which light passes to enter the camera. It is an easy concept to understand if you just think about how your eyes work. As you move between bright and dark environments, the iris in your eyes either expands or shrinks, controlling the size of your pupil. In a camera, your pupil is the aperture.
ISO: ISO is simply a camera setting that will brighten or darken a photo. As you increase your ISO number, your photos will grow progressively brighter. For that reason, ISO can help you capture images in darker environments
If using an Iphone, you can also adjust this by clicking on the yellow square that shows up when you open your camera app. You will see a sun on the side of the yellow box. You can click and drag the sun up and down to adjust how bright or dark the image will be.
Share with us what yours looked like by posting on Instagram using the hashtag #OAPhotoMondays and follow @oakwoodarts, or email your photos to liana@oakwoodarts.org
WEEK #5: Still Life Self Portrait
If you’re like me and many other photographers, you may love being behind the camera, but not so much being in front of the lens. (If you also like to model that’s awesome!) In this exercise I want to challenge you to take a self portrait without your face!
To get started, go into a room where you keep many personal belongings, for example, your bedroom, living room, office, or studio.
Walk around the room looking closely at your things. Look inside drawers and boxes as well as at objects in open view. As you look, make a list of items with which you feel a strong, intimate connection. Think: Which objects would you miss most if you lost them? Which objects would help explain to someone who doesn’t know you something about you?
Next, look at your list and select four or more objects which belong to separate parts of your life – to different ages or places or personal relationships.
Gather the four or more special objects and arrange them around you on the floor, as if they were four points of a compass with you at the center.
Draw a circle on a sheet of paper and divide it into four quadrants with a point for you at the center. Label each quadrant with the name of one object. Pick up an object and examine it, letting your feelings of attachment envelop you. Fill in one quadrant with words and phrases saying what concepts and emotions the object represents for you. Why do you cherish this object? What aspects of your personality does it symbolize? What does it signify about your relationships with other people, either with specific individuals or with types of people? Does the object have any special power for you, like a good luck charm?
Continue your examination by assessing any visual qualities which make each object special or identifiable. Repeat, picking up objects one by one and writing notes until you have filled in a quadrant for each of the four objects. Don’t worry if your interpretation of your attachment to an object is inconsistent. Include whatever ideas occur to you. Can you imagine incorporating any or all of these objects as symbolism of you in a still-life photograph?
Some things to consider before photographing:
What do you want the background of your image to be? Take a look at these examples of two photographs by a past Oakwood Arts Mentor Amarise Carreras. (Who just won an #ILYSM4artists Grant. Congrats Amarise!) In one of their photos the background is a physical place; a basketball court. In the other image the background is color. They used paper and lighting to create this effect. Do you remember when we made still-lives at the office? We used a black bedsheet to make a black background for our images. You can do the same at home by pinning a bed sheet (make sure it’s not wrinkly) or paper to the wall.

Santos Rojos, Still Life Altares, Amarise Carreras.

La niña Mari con La Madre, Still Life Altares, Amarise Carreras.
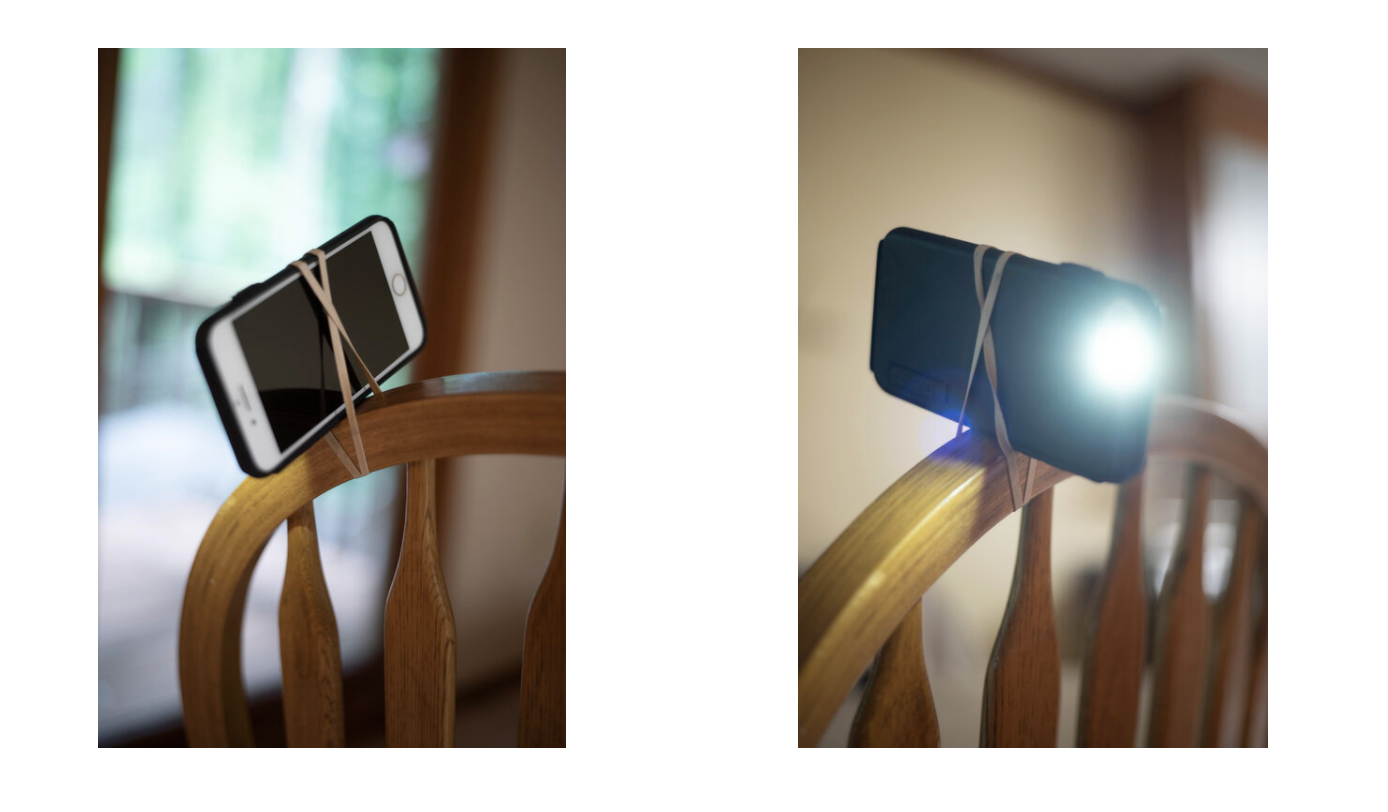
In a pinch, I have used an Iphone, rubber banded to a chair to add a little more light for a photograph. You can also use reflective objects, like a white pillow or some tinfoil to help bounce the sunlight in the direction you want. Think back to when we learned about how to use reflectors!
What type of lighting would portray the kind of emotion you are trying to show? How can you use light to make your objects appear differently? Do you have lamps to create a dramatic scene? Do you want to use the natural light from the sun?
Think about your composition. Will you show the whole object in the frame, shoot close up, or even show just a part of the objects? How might these choices affect your image?
Think about your point of view when taking the photo, what angle are you shooting from? Are you shooting from up high, low, centered, close, far away? How might this affect how your photo turns out and how the image feels to the viewer.
Will you photograph in black and white or in color? Will you do any editing or adjustments after you shoot? how might that affect how the photograph feels?
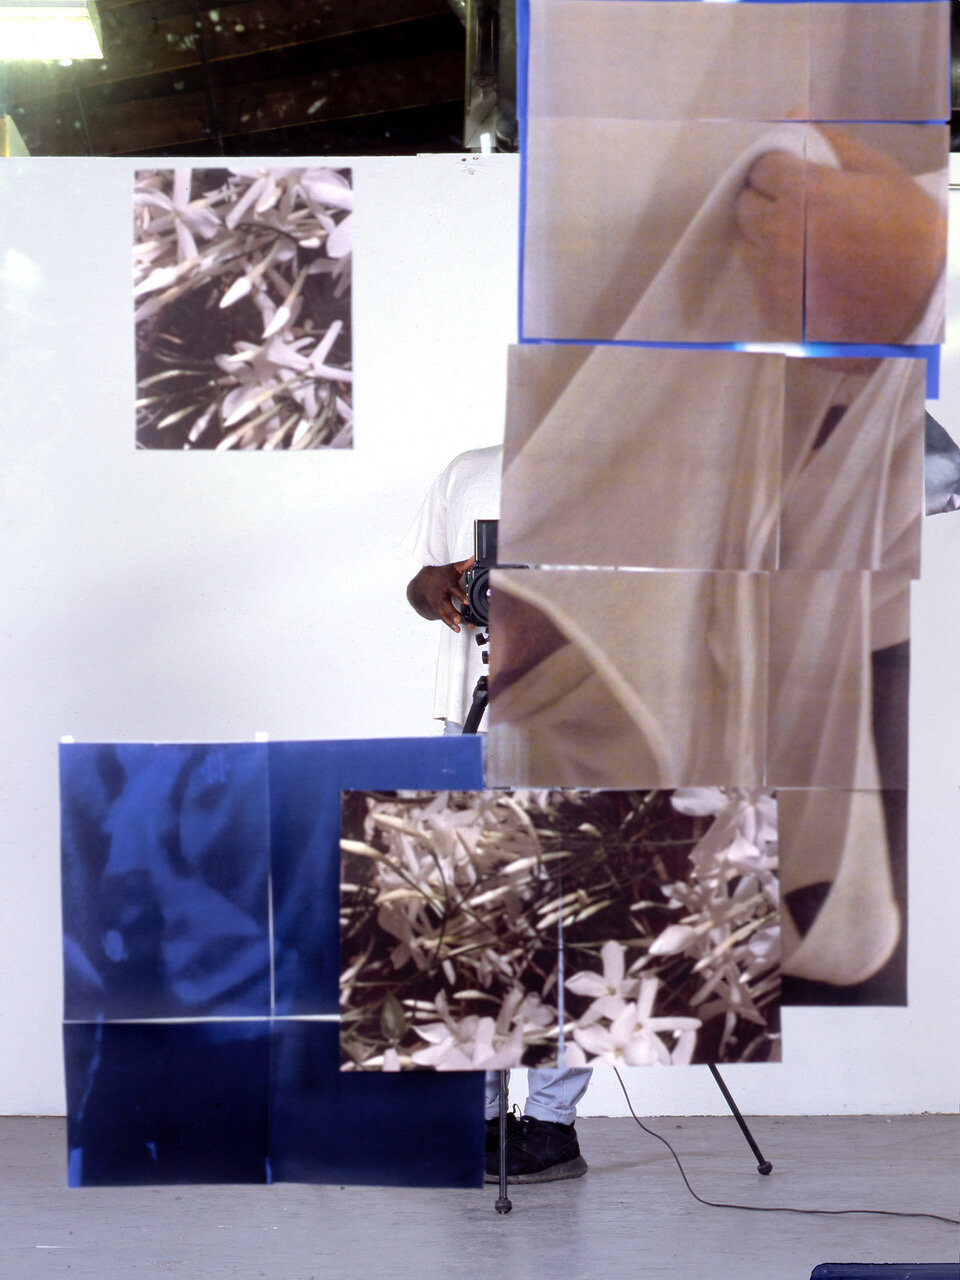
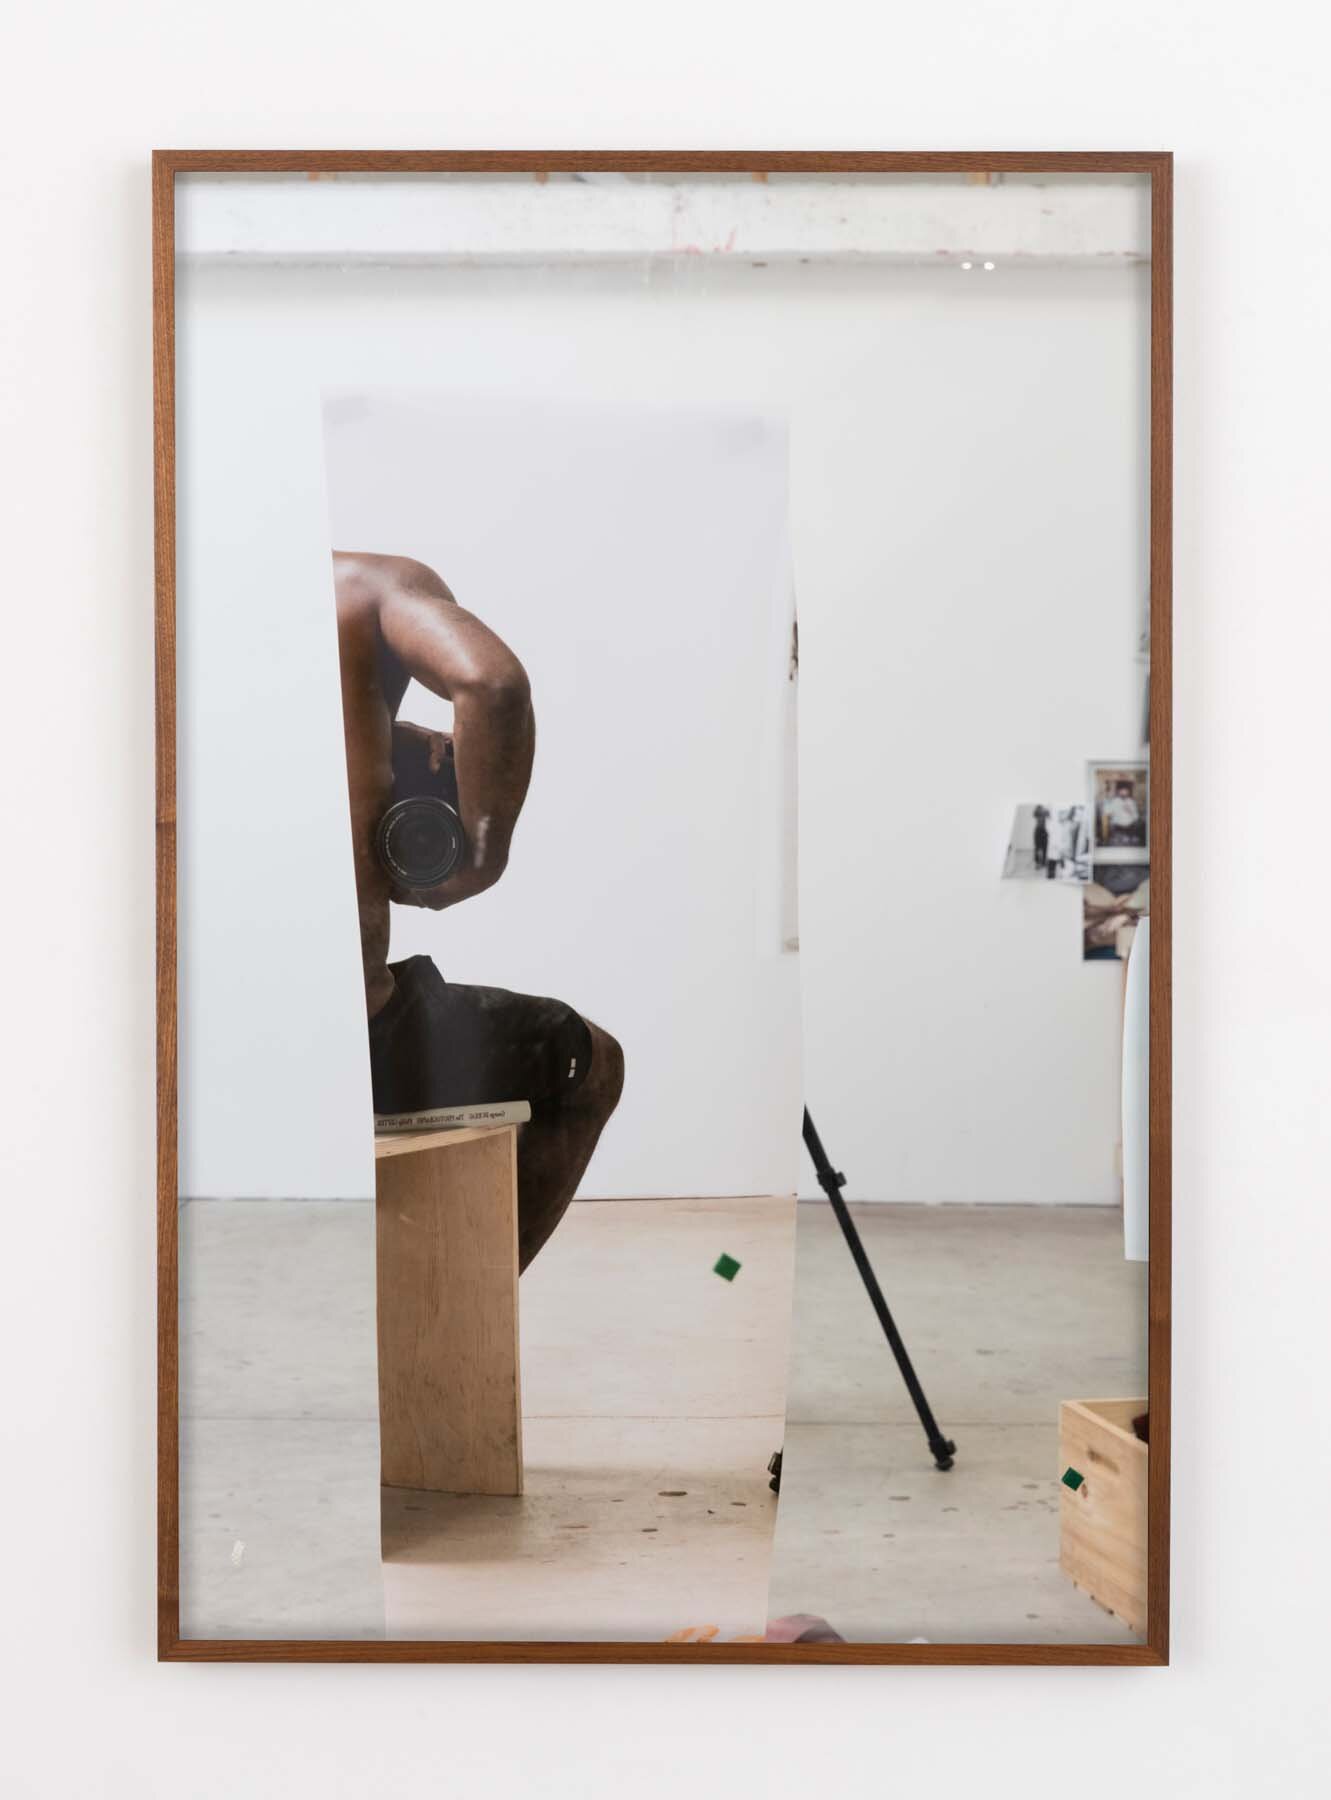
Another creative way to think about this exercise is to take inspiration from one of my favorite photographers Paul Mpagi Sepuya. He is a contemporary photographer (who just had some photographs up at the ICA right here in Richmond in the same show with Carrie Mae Weems!). Instead of using objects to take his faceless self portraits he uses combinations of mirrors, paper, tape, fabric, and other photographs. He frames the image so that you can’t see the edges of the mirror. You are welcome to try this method instead of using objects, but make sure all the images or items you choose to incorporate are things that symbolize you!
Tip: If you photograph in the mirror make sure the background behind you is a solid color. It can be a blank wall, a bedsheet or other type of fabric that you pin up — this way it will be easier to see everything that is in the mirror.
More about Paul Mpagi Sepuya’s work:
Share your work by posting on Instagram using the hashtag #OAPhotoMondays and follow @oakwoodarts, or email your photos to liana@oakwoodarts.org
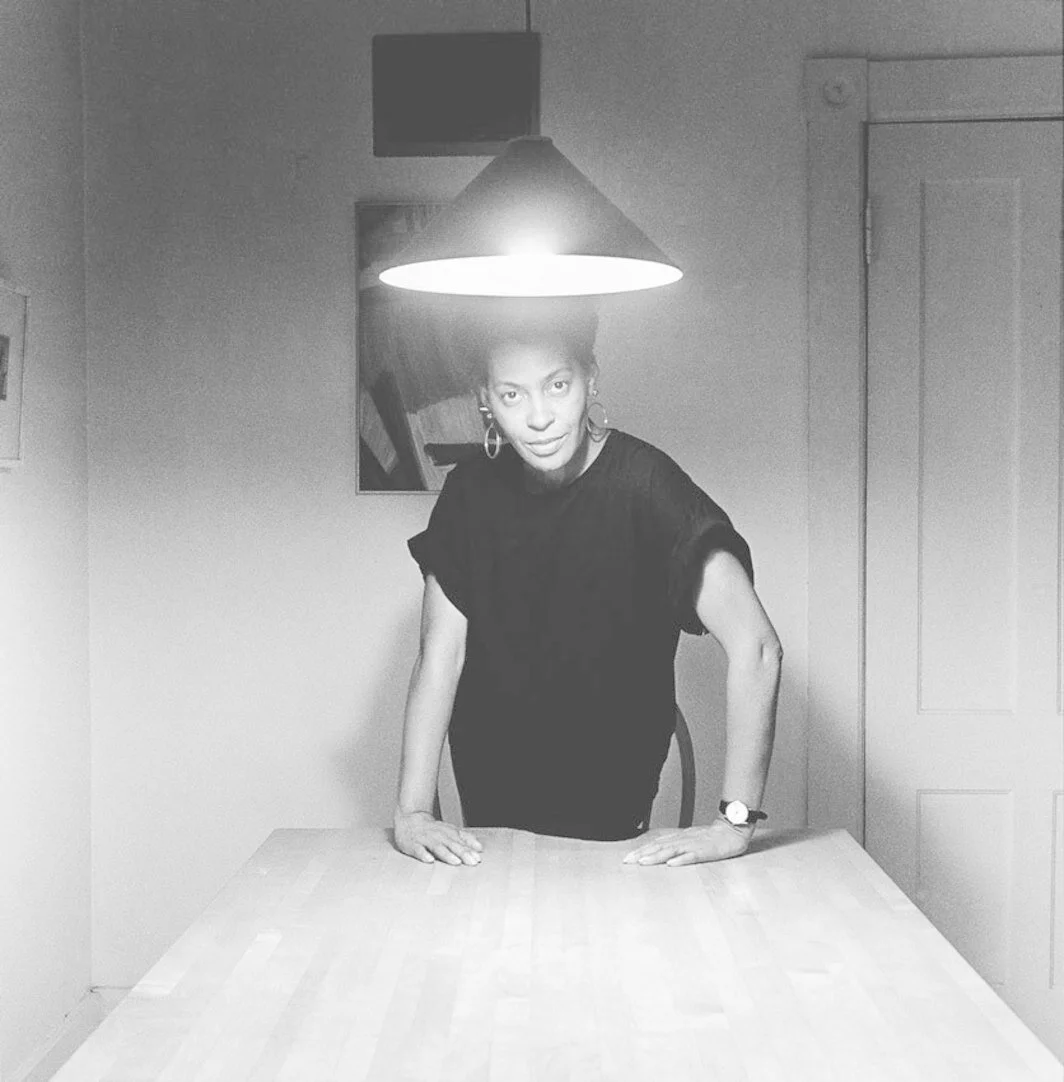
WEEK #4: After Carrie Mae Weems, Kitchen Table Series
You are a documenter of your own life! Carrie Mae Weems is a very famous photographer. Considered one of the most influential contemporary American artists, Carrie Mae Weems has investigated family relationships, cultural identity, sexism, class, political systems, and the consequences of power. Recently some of her work was shown at the ICA here in Richmond! For this week’s exercise take inspiration from Carrie Mae Weems photographic project Kitchen Table Series.
“I made them all in my own kitchen, all in my own house, using a single light source hanging over the kitchen table. It just sort of swung open a door of possibility, of what I could actually do in my own environment, of whatever I chose, and whichever way I wanted in this very particular place or moment in time.”
We are all living through a very new way of life at this moment in time. During this Stay At Home order you are probably finishing your school year from your house, finding virtual ways to interact with your friends and family, among many other things! Through this exercise, depict what your day is like right now. Choose a room in your house that you can stage or set up the moments of your day, using Carrie Mae Weems’ Kitchen Table Series as inspiration. Plan to make a series of 5 photos that really tell the viewer about what your life is like right now.


Fun Fact: Kendrick Lamar was inspired by Carrie Mae Weems’ Kitchen Table Series when making the music video for the song “LOVE”.

To get started,
Make a schedule of the most significant things you are doing each day (or each week). Use this list to decide the 5 photos you will set up.
Choose a room in your house that makes the most sense for your photos. You have to use the same place for all 5 photos! Tip: Notice that in some of Carrie Mae Weems photos, she has different props or things in the background. You can set up a lot of the pieces of the image. Think about how these elements can help you tell your story.
Gather all the things you will need: props, things for the background, light, etc.
You will need to set up your camera on something for these photos. If you do not have a tripod, find sturdy objects or furniture that you can put your camera on top of. Sometimes I will use a stack of big books on a table or a chair. (Very Important: make sure whatever you decide to use is strong and safe for your camera to be on top of and that no pets or siblings will knock it over!)
Figure out where the self timer is on your camera. Iphones also have self timers in their camera app. It is located at the top right corner of the screen and resembles an analog clock. On most cameras there is a 3 or 10 second timer option. It will give you that long to get ready before it takes the picture. Test it out! Youtube has a lot of answers; if you can’t find your self timer search the make and model of your camera and “self timer”
Some things to consider before photographing,
Does the room you chose have a strong enough light source for making pictures? Do you have a bright lamp you can bring into the room? Do you need to choose a different room that has bright window light? Do you want your images to be dark and dramatic or bright and soft?
Do you want to include other people from your house in one or more of these photos? If so, talk to that person about what you are working on to see if they are willing to pose with you. If they are interested in posing with you, remember that part of your job as a photographer is to help them feel comfortable in front of the camera and tell them how to pose. Some people will feel nervous if you don’t communicate what you want them to do in your photo.
Have a pet that you want to join your photo? Get creative with how to capture your pets with you! Do you hold them? Do you have an assistant helping you get your pet to look at the camera? Do you let your pet be natural in the frame?
Will you photograph in black and white or in color? Will you do any editing or adjustments after you shoot? how might that affect how the photograph feels?
Think about your point of view when taking the photo, what angle are you shooting from? Are you shooting from up high, low, centered, close, far away? How might this affect how your photo turns out and how the image feels to the viewer.
Share your work by posting on Instagram using the hashtag #OAPhotoMondays and follow @oakwoodarts, or email your photos to liana@oakwoodarts.org
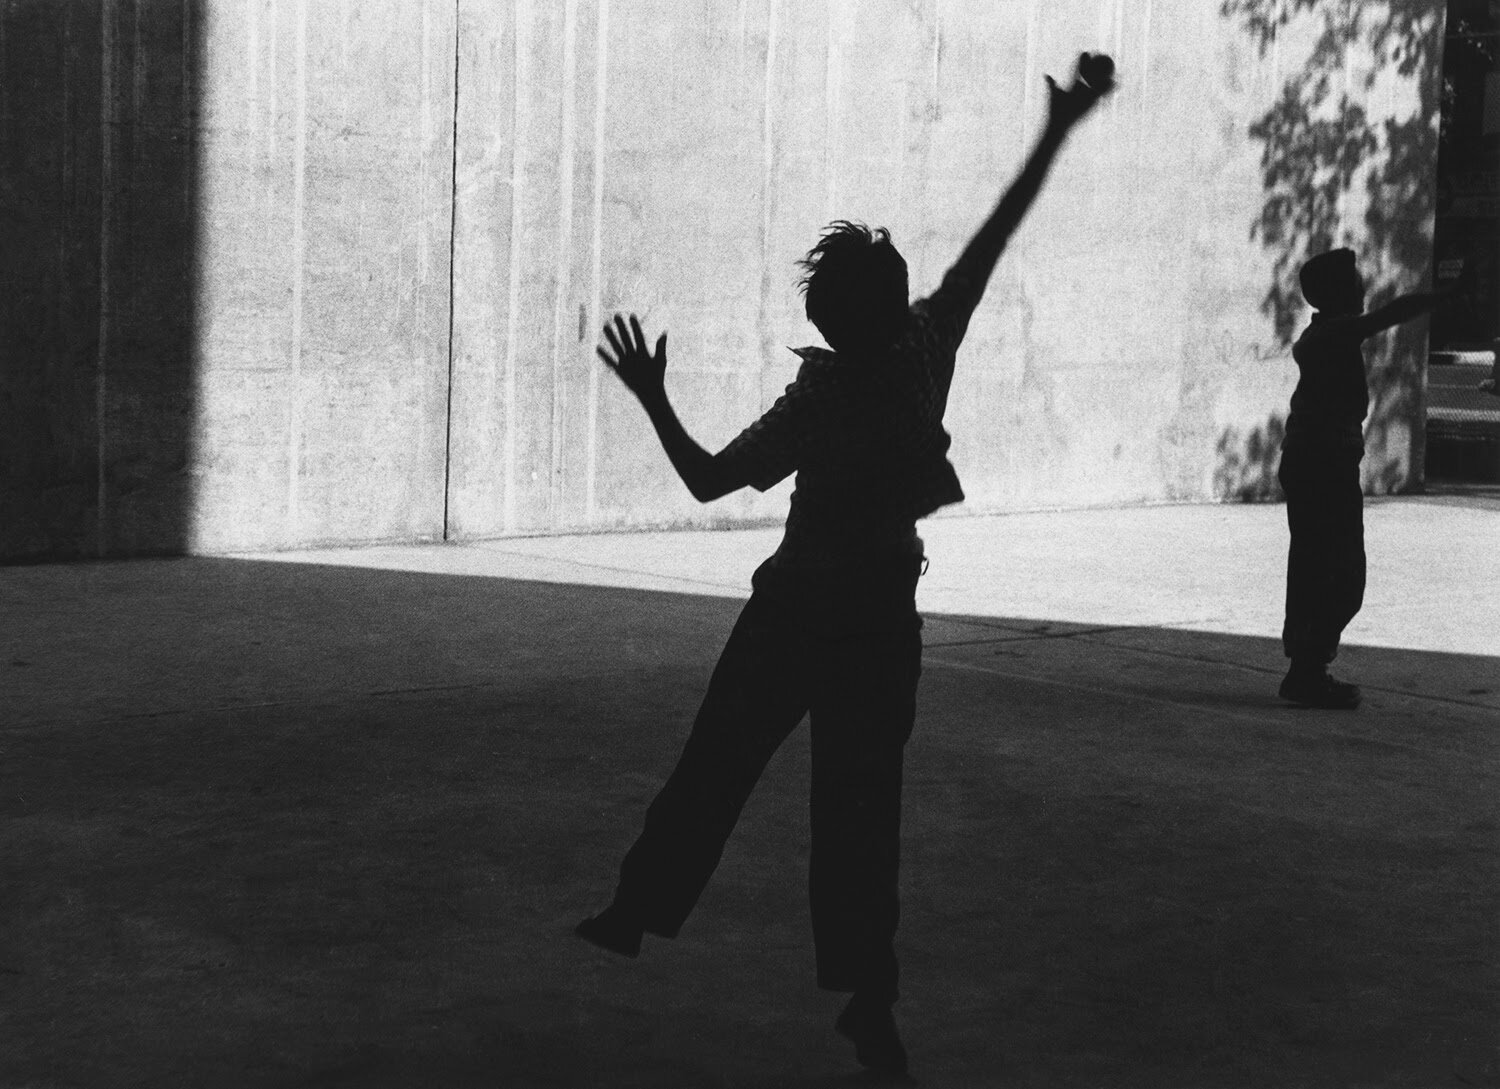
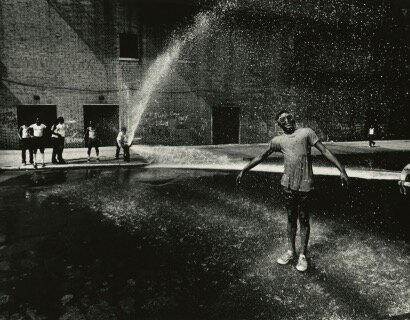
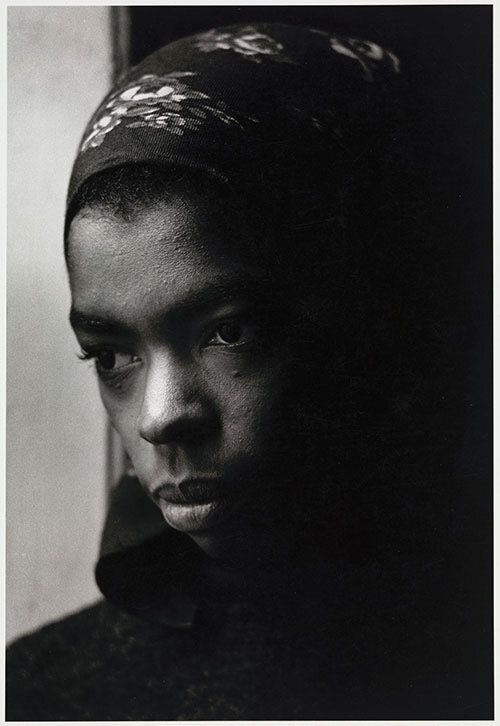
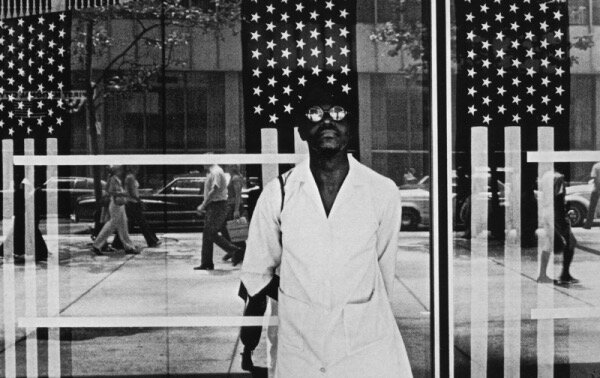
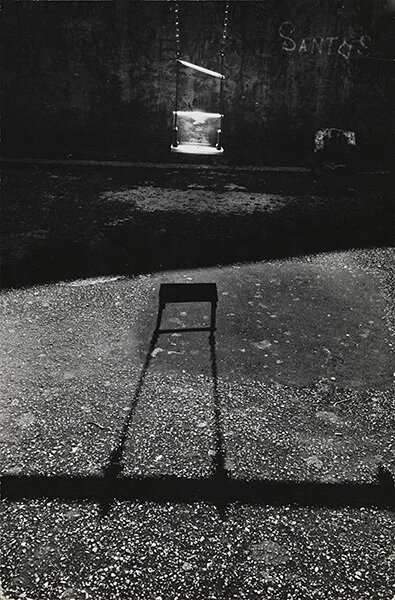
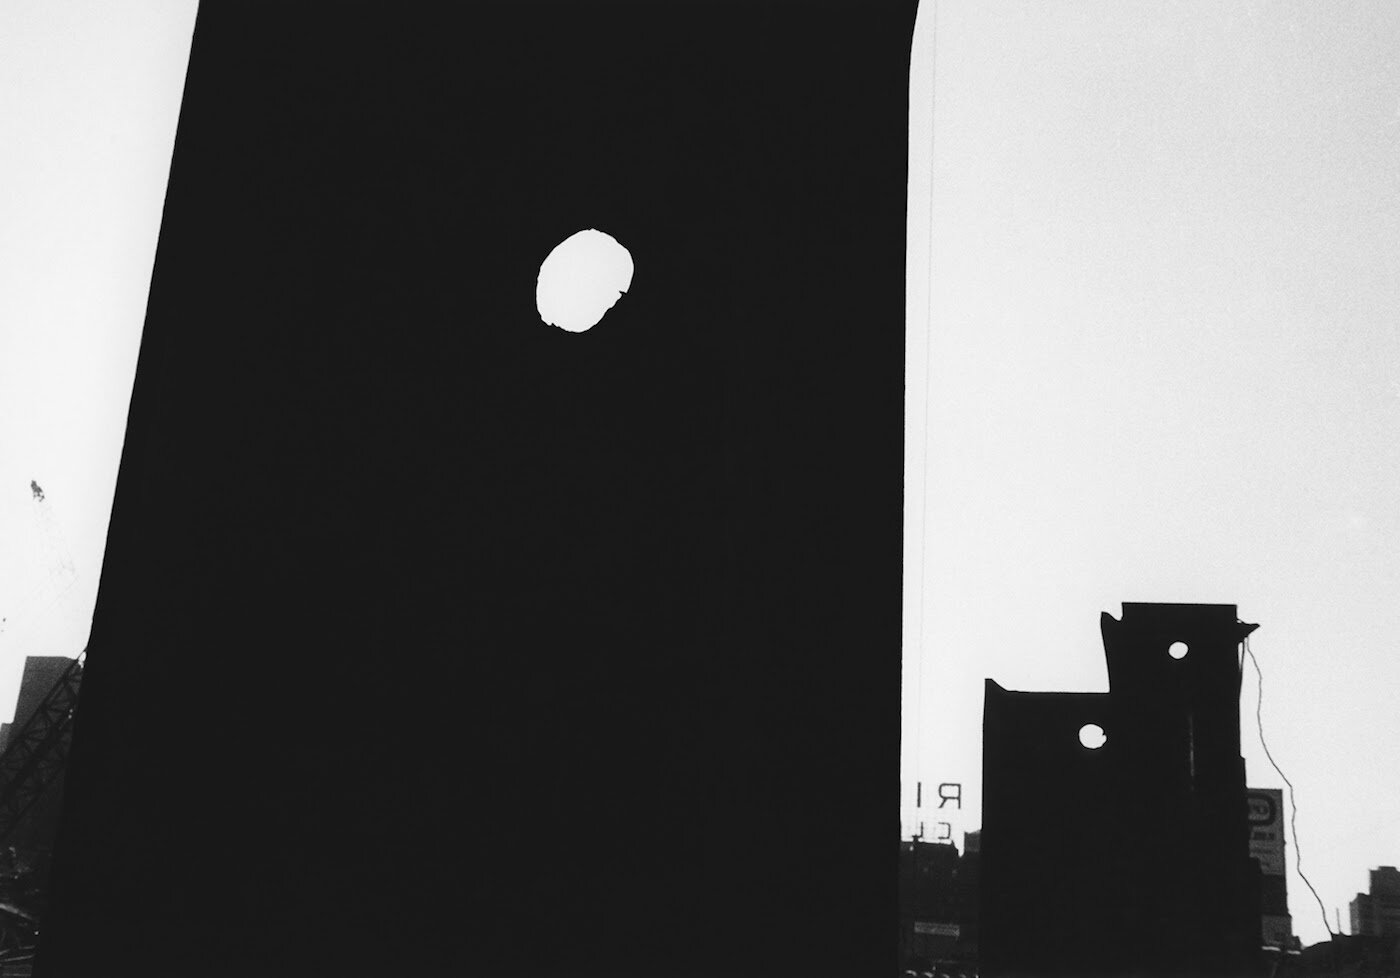
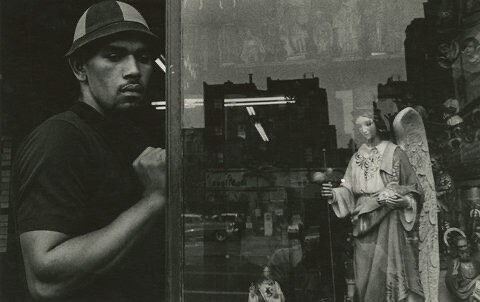
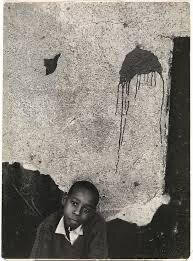
WEEK 3: Explore the Work of photographer Louis Draper
We hope that everyone had a chance to to see the Working Together: Louis Draper and the Kamoinge Workshop exhibition at the VMFA before the museum had to close. While we wish we had more time to see spend in the exhibition we are thrilled that until that time comes we can spend time exploring the museum’s Louis H. Draper Archive Portal https://www.vmfa.museum/collections/search-archives/louis-h-draper-archive-portal/.
Louis Draper was Mr. Draper was born in 1935 just beyond the city limits of Richmond, in a house that his sister, Nell Draper-Winston, still calls home. Primarily a street photographer, Draper’s archive has reveals an incredible range of artistic skill, including portraiture and abstraction.
For this week’s assignment we encourage everyone to check out Draper’s photographs, and use them as inspiration to document their own lives and the world around them from their perspective during this unique time in history.
Share your work by posting on Instagram using the hashtag #OAPhotoMondays and follow @oakwoodarts, or email your photos to liana@oakwoodarts.org
Student Work Highlight: Michael Hill, 7th Grade.
WEEK 2: Portrait Assignment - What Object Means the Most to someone you love?
For this week’s assignment, document a family member with an object that is the most meaningful to them. You can also try this project with each one of your family members if you have time! Before you begin to photograph, ask your family member a few questions about why they chose that object, and think about how the story behind the object might affect how you chose to photograph them.

Kelsey’s Tint-O-Rama
“I really like that this object seems like it’s one of a kind. I got it on a special family vacation in Croatia with my grandma and my mom 3 years ago. I would definitely be upset if it ever broke, but I would also consider giving it away as a gift to make someone else happy. I love that it reminds me of the trip that I took with my family, and it makes me think about bringing a little bit of the ocean into my home.” -Kelsey, my roommate

Jude’s Banana
“Jude has had this toy since he was born 9 months ago. He received it as a gift from his cousins, and it’s his favorite bath toy. It represents his happy and fun loving personality and he would probably cry if it ever got lost!” - Kelsey, Jude’s mom
To get started, here are a few interview question ideas to ask your family member:
What about that object makes it unlike any other?
How long have you had it?
Is there a story behind how you acquired it?
How would you feel if it ever went missing or broke? Would you ever consider giving it away?
When you look at the object what does it make you think about?
What do you think this object says about you as a person?
(Add your own questions!)
Some things to consider before photographing:
What type of lighting would portray the kind of emotion you are trying to show?
Think about your composition. Will you show the subjects whole body in the frame, shoot close up, or even show just a part of their body? How might these choices affect your image?
Do you want the photograph to feel staged or more natural? How might this affect how you ask to photograph the subject
Think about your point of view when taking the photo, what angle are you shooting from? Are you shooting from up high, low, centered, close, far away? How might this affect how your photo turns out and how the image feels to the viewer.
If you are taking multiple portraits, will all your portraits be set up in a similar way, like a series, or will they all be shot differently with a new idea for each one?
Will you photograph in black and white or in color? Will you do any editing or adjustments after you shoot? how might that affect how the photograph feels?
SHARE YOUR PHOTOS AND YOUR INTERVIEW WITH US! We can’t wait to see what you create!
Post your work each week on Instagram using the hashtag #OAPhotoMondays and follow @oakwoodarts! Don’t use social media? You can also email your photos to liana@oakwoodarts.org
WEEK 1: MAKE A PHOTOGRAPHIC FIELD GUIDE!
This week’s prompt is an assignment from the “Learning to Love You More” project by artists Miranda July and Harrell Fletcher

See more at www.learningtoloveyoumore.com
More about the Project:
“Learning to Love You More is project comprised of work made by the general public in response to assignments given by the artists. Participants accepted an assignment, completed it by following the simple but specific instructions, and their work got posted on-line.
Like a recipe, meditation practice, or familiar song, the prescriptive nature of these assignments was intended to guide people towards their own experience. Since Learning To Love You More was also an ever-changing series of exhibitions, screenings and radio broadcasts presented all over the world, participant's documentation was also their submission for possible inclusion in one of these presentations. From 2002 to its close in 2009, over 8000 people participated in the project.” -San Fransisco Musuem of Modern Art
Let’s try assignment #66 - Make a field guide to your yard:
“This assignment is for people who haven't spent much time with the land around where they live. Maybe you live in an apartment and the yard is maintained by someone else, or maybe you just have a parking strip that seems to belong to the city. Maybe you live in a dorm and the "yard" is in the quad. Leave your home with a camera and big piece of white cardboard. Look around.
Each time you see a new kind of living thing, put the white cardboard behind it and take a picture of it against this white background. This will be easiest if you have a friend who can hold the cardboard up.
Take photographs of every single different growing thing that you see. Notice grasses, weeds, flowers, trees, insects, birds, cats, dogs. You don't have to identify what anything is, just take a photograph, as if you are a scientist on an island that no human has ever set foot on before.”
-Project and image via the San Fransisco Musuem of Modern Art
Check out our student work from this week!


Student work by Michael Hill, Grade 7